Why Your Desk Setup Is Making You Hurt (And How to Fix It)
How to set up your desk ergonomically comes down to five core adjustments you can make right now:
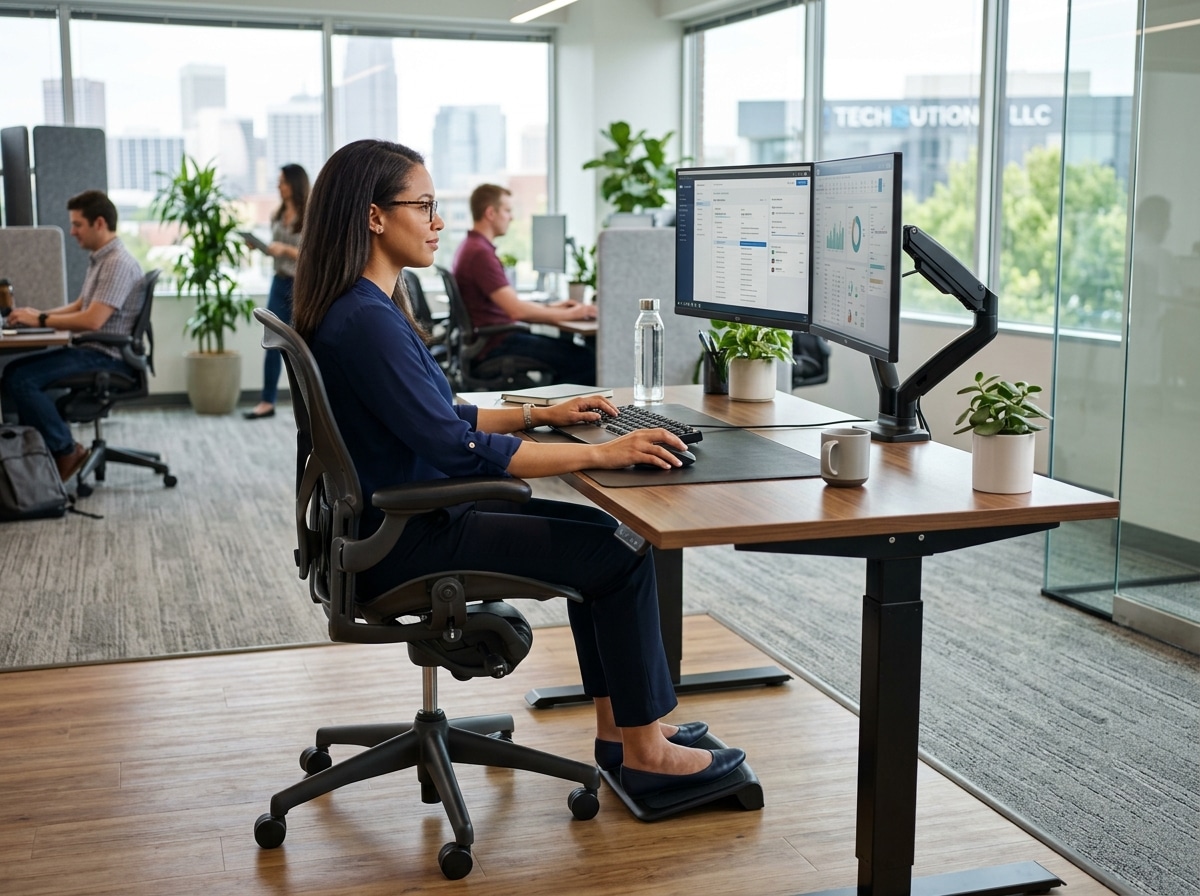
- Chair height – Feet flat on the floor, knees bent at 90 degrees, hips level with or slightly above knees
- Desk height – Forearms parallel to the floor, elbows at roughly 90 degrees, shoulders relaxed
- Monitor position – Top of screen at eye level, 20-40 inches from your face
- Keyboard and mouse – Close to your body, wrists neutral and straight, “H” key aligned with your body’s center
- Movement – Change position every 15-30 minutes, stretch every hour
Most of us spend 8+ hours a day at a desk. That’s a lot of time for a bad setup to quietly do damage.
Neck stiffness. Lower back pain. Tingling in your hands. These aren’t just annoyances — they’re early warning signs of musculoskeletal disorders (MSDs), which affect muscles, nerves, tendons, and joints. The good news? Most of these problems are preventable with a few simple, evidence-based adjustments.
Ergonomics isn’t about buying expensive gear. It’s about fitting your workspace to your body — not the other way around.

How to Set Up Your Desk Ergonomically: The Foundation
When we talk about how to set up your desk ergonomically, we have to start from the ground up. Your chair and desk are the foundation of your entire workday. If these are out of alignment, every other adjustment you make — like moving your monitor or buying a fancy mouse — will just be a Band-Aid on a larger problem.
The goal is to achieve a “neutral posture.” This is a position where your joints are naturally aligned, reducing stress on your muscles, tendons, and skeletal system. Think of it as the path of least resistance for your body. When we stray from this neutral path, we start experiencing “contact stress” (pressure from hard surfaces) and muscle fatigue.
According to Office ergonomics: Your how-to guide, the relationship between your chair and desk height is the most critical factor in preventing long-term injury.

Adjusting Your Office Chair for Total Support
Your chair shouldn’t just be a place to sit; it should be a tool that supports your spine’s natural curves. Here is how we recommend adjusting it for total support:
- The 90-Degree Rule: Adjust your seat height so that your feet rest flat on the floor. Your knees should be bent at roughly a 90-degree angle, with your hips level with or slightly higher than your knees. If your feet dangle, you’re putting pressure on the back of your thighs, which can restrict blood flow.
- Seat Depth: You should be able to sit with your back against the backrest and still have a small gap (about 2 to 4 fingers wide) between the front edge of the seat and the back of your knees. If the seat is too deep, it will press against the back of your knees; if it’s too shallow, your thighs won’t be properly supported.
- Lumbar Support: This is the most famous part of ergonomic chairs for a reason. The curve of the backrest should fit into the small of your back. If your chair doesn’t have built-in support, a rolled-up towel or a small pillow can work wonders.
- The Perfect Recline: Contrary to what we were told in grade school, sitting at a perfectly rigid 90-degree angle isn’t actually the best for your back. Research suggests a slight recline of 100 to 110 degrees is ideal because it allows the chair to take more of your body weight, reducing the load on your lower spine.
- Armrest Positioning: Adjust your armrests so your shoulders are relaxed and your elbows rest gently at about a 90-to-110-degree open angle. If the armrests are too high, your shoulders will hunch; if they’re too low, you’ll lean to one side, throwing your spine out of alignment.
Finding the Ideal Desk Height for Your Body
Once your chair is set, it’s time to look at the desk. The biggest mistake we see is people trying to adjust their chair to a fixed desk height. This often leads to feet dangling or shoulders shrugging.
The Golden Rule of Desk Height: When you are sitting (or standing) at your desk, your forearms should be parallel to the floor, and your wrists should be neutral (flat). Your elbows should be at your sides, bent at about 90 degrees.
- If your desk is too high: You’ll find yourself shrugging your shoulders to reach the keys, leading to neck and shoulder tension. If you can’t lower the desk, raise your chair and use a footrest to keep your feet supported.
- If your desk is too low: You’ll likely hunch forward. You can raise a low desk using sturdy blocks or commercial desk risers.
- Leg Clearance: Ensure there is enough room under your desk for your legs and feet. Avoid using the space under your desk for storage; you need to be able to pull your chair in close enough so you aren’t reaching for your keyboard.
- Contact Stress: Look for desks with rounded edges. If your desk has a sharp “knife” edge, it can compress the nerves in your forearms. We recommend using a padded wrist rest or edge guard to mitigate this.
| Joint | Ideal Sitting Angle | Ideal Standing Angle |
|---|---|---|
| Elbows | 90° – 110° | 90° – 100° |
| Hips | 90° – 110° | Neutral (Straight) |
| Knees | 90° | Neutral (Slightly unlocked) |
| Ankles | 90° | 90° |
Optimizing Your Monitor, Keyboard, and Mouse
Now that the foundation is set, we can move on to the “cockpit” — the area where you spend most of your active energy. This is where many repetitive strain injuries (RSIs) like carpal tunnel syndrome or “tech neck” originate.
When considering how to set up your desk ergonomically, we must treat the monitor, keyboard, and mouse as a single integrated system.
Positioning Your Monitor to Prevent Neck Strain
Your head weighs about 10-12 pounds. For every inch you lean your head forward, the effective weight on your neck muscles doubles. This is why monitor placement is non-negotiable for neck health.
- The Eye Level Rule: The top third of your screen should be at eye level. When you look at the center of the screen, your eyes should be looking slightly downward (about 15 to 30 degrees).
- Distance: Your monitor should be about an arm’s length away — roughly 20 to 40 inches (50 to 100 cm). If it’s too close, you’ll experience eye strain; if it’s too far, you’ll lean forward to read, ruining your posture.
- Bifocal Adjustments: If you wear bifocals, you might find yourself tilting your head back to see through the bottom of your lenses. In this case, we recommend lowering the monitor an additional 1 to 2 inches or tilting the screen slightly upward.
- Dual Monitor Alignment: If you use two monitors equally, place them side-by-side in a slight “V” shape, with the point where they meet directly in front of you. If one is your primary screen, place it directly in front of you and the secondary screen to the side at an angle.
- Screen Tilt: Tilt the screen back 10 to 20 degrees. This helps maintain a natural viewing angle and can reduce glare from overhead lights.
How to Set Up Your Desk Ergonomically for Typing and Mousing
At Dims Finance, we emphasize that your input devices are where the “rubber meets the road” for ergonomics.
- The “H” Key Alignment: Center your keyboard in front of you. A great tip is to align the “H” key (or the split in a split keyboard) with the center of your body. This ensures your arms are positioned symmetrically.
- Floating Wrists: When typing, your wrists should be neutral and straight — not bent up, down, or to the sides. We recommend “floating” your wrists while typing rather than resting them on a pad. Use wrist rests only to support your palms between typing sessions.
- Mouse Placement: Your mouse should be on the same surface as your keyboard and as close to it as possible. Reaching out to the side for your mouse is a leading cause of shoulder pain.
- Mouse Sensitivity: Set your mouse sensitivity high enough so that you can move the cursor across the screen with small, gentle movements of your hand, rather than large sweeps of your entire arm.
- Laptop Users: Working directly on a laptop is an ergonomic nightmare because the screen and keyboard are attached. To fix this, we recommend using a laptop stand to bring the screen to eye level and connecting an external keyboard and mouse.
Mastering the Sit-Stand Desk Transition
Sit-stand desks are fantastic tools, but they aren’t magic. In fact, standing all day can be just as hard on your body as sitting all day, leading to sore feet, varicose veins, and lower back strain. The key is alternation.
According to How to create an ergonomic desk setup and productive workstation, 87% of users felt more comfortable and energized after just four weeks of using a sit-stand desk correctly.
The 1:1 or 2:1 Ratio: We recommend a sitting-to-standing ratio of roughly 1:1 or 2:1. For every hour of work, try sitting for 40 minutes and standing for 20. At the very least, aim to change your position every 30 to 60 minutes.
- The 4-Hour Limit: Research suggests we should stand for no more than 4 hours total throughout an 8-hour workday.
- Standing Desk Height: When standing, the desk should still be at elbow height. Your elbows should form a 90-degree angle, and your shoulders should remain relaxed.
- Supportive Footwear: Avoid standing in heels or completely flat, unsupportive shoes. If you have a standing desk, consider keeping a pair of supportive sneakers at your workstation.
- Anti-Fatigue Mats: A high-quality anti-fatigue mat is essential. It encourages “micro-movements” in your legs, which keeps blood circulating and prevents your joints from locking up.
- Weight Shifting: Don’t stand perfectly still. Shift your weight from foot to foot, or use a small footrest to prop up one foot at a time, which helps take the pressure off your lower back.
Environmental Factors and Healthy Habits
Ergonomics isn’t just about furniture; it’s about the entire environment. If the room is too dark, you’ll squint. If it’s too cold, your muscles will tense up.
- Lighting and Glare: Position your desk perpendicular to windows to avoid glare. Use task lighting (like a desk lamp) for reading physical documents, but ensure it doesn’t reflect off your screen.
- The 20-20-20 Rule: To prevent digital eye strain, every 20 minutes, look at something 20 feet away for at least 20 seconds. This allows your eye muscles to relax.
- Temperature Control: Did you know that women may need their workspace to be about 5.4°F (3°C) warmer than men due to lower metabolic rates? The ideal range for most is between 71.6°F and 75.2°F. If you’re cold, your muscles tighten, making you more prone to strain.
- Hydration: Staying hydrated keeps the discs in your spine plump and functioning as effective shock absorbers. Plus, drinking water forces you to get up for bathroom breaks — a built-in ergonomic timer!
- Noise Management: Chronic noise increases cortisol (stress hormone) levels, which leads to muscle tension. If your office is loud, noise-canceling headphones with ambient or lo-fi sounds can help you maintain a relaxed posture.
- Micro-breaks: A 30-second “micro-break” every 20 minutes — just long enough to shake out your hands and take a deep breath — can be more effective than one long break in the middle of the day.
Frequently Asked Questions About Ergonomic Setups
How can I set up my desk ergonomically on a budget?
You don’t need a $1,000 chair to be ergonomic. Some of the best fixes are free:
- Monitor Stand: Use a stack of sturdy textbooks or a cardboard box to raise your monitor to eye level.
- Footrest: A small stool or even a sturdy binder can serve as a footrest if your chair is too high.
- Lumbar Support: A rolled-up towel or a small cushion placed in the curve of your lower back can mimic an expensive ergonomic chair.
- Laptop Fix: If you can’t afford a full setup, at least buy a cheap external mouse so you aren’t using the trackpad all day, which is very hard on the wrists.
What should I do if I still feel pain after adjustments?
If you’ve followed these steps and still experience persistent pain, tingling, or numbness, it’s time to seek professional help. An occupational therapist or a professional ergonomic assessment can identify subtle issues you might have missed.
Ergonomics is a process of “fitting the task to the worker.” Sometimes your specific body proportions or a pre-existing condition require a more personalized approach. Don’t “push through” the pain; that’s how temporary strain becomes a chronic injury.
Is it better to sit or stand all day?
Neither! The best posture is your next posture. Static postures — whether sitting or standing — are the enemy of circulation and joint health. The human body was designed for movement. The goal of an ergonomic setup is to make it easy for you to transition between different supported positions throughout the day.
Conclusion
At Dims Finance, we believe that a productive life starts with a comfortable body. Learning how to set up your desk ergonomically is one of the highest-ROI investments you can make in your career and your long-term health. By focusing on neutral postures, proper monitor alignment, and the “cockpit” layout of your keyboard and mouse, you can drastically reduce your risk of RSIs and boost your daily energy levels.
Science-based comfort isn’t a luxury; it’s a necessity for the modern professional. Small tweaks today — like raising your monitor or adjusting your chair recline — pay massive dividends in the years to come.
Ready to upgrade your workspace? Browse our ergonomic office furniture to find tools designed to support your body and your best work.