The Science of Keyboard Ergonomics Position
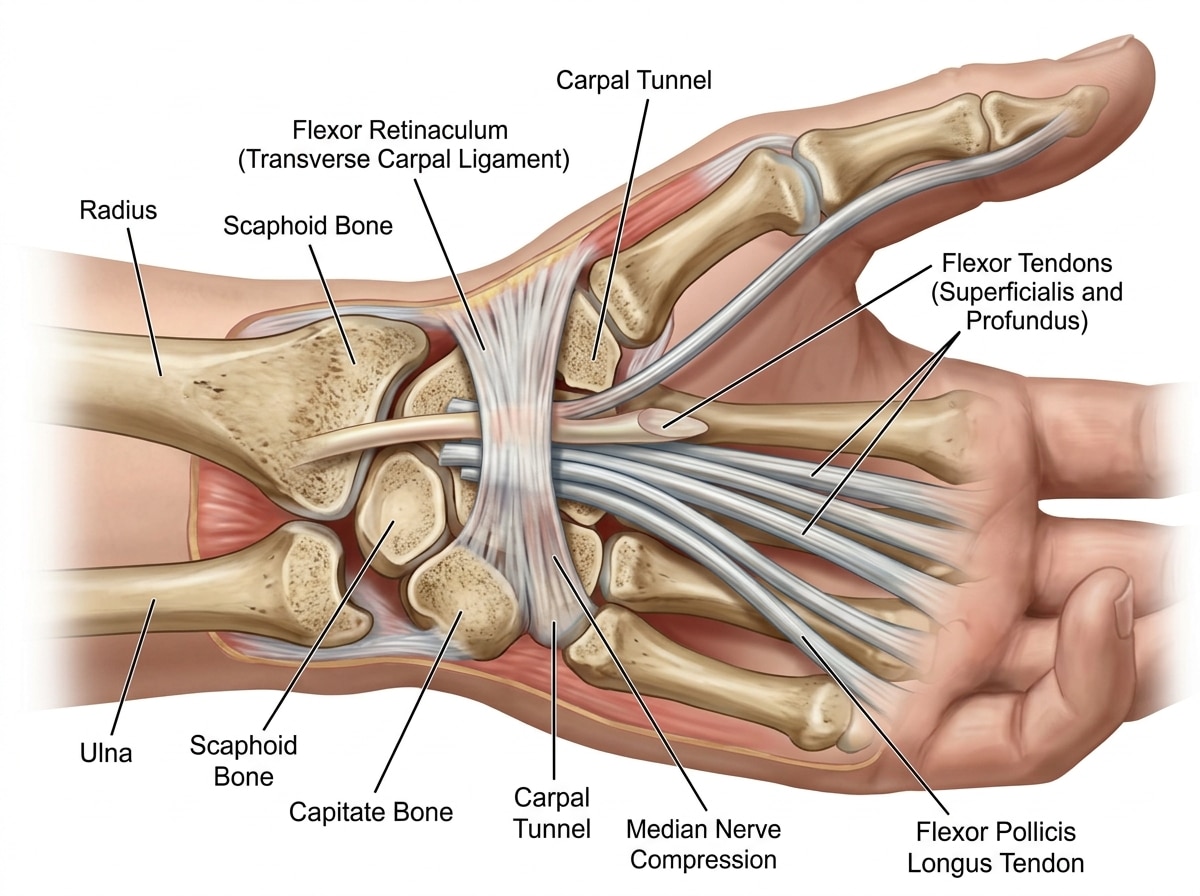
To understand why keyboard ergonomics position matters, we have to look under the skin. Your wrist is a complex highway of tendons, blood vessels, and the median nerve, all passing through a narrow opening called the carpal tunnel. When we type with our wrists bent upward (extension), downward (flexion), or slanted toward the pinky finger (ulnar deviation), we constrict this highway.
A “neutral wrist” is the gold standard. This means your hand is a straight architectural extension of your forearm. Achieving this isn’t just about the keyboard; it’s about the relationship between your chair, your desk, and your elbows.
The “90-degree rule” is a classic for a reason, though modern research suggests an even more relaxed range. Ideally, your elbows should be bent between 90 and 110 degrees. This open angle helps maintain blood flow and prevents nerve compression at the elbow. If your keyboard is too high, you’ll find yourself “shrugging” your shoulders to reach the keys, leading to neck tension. If it’s too low, you’ll likely compensate by dropping your wrists onto the hard edge of the desk, creating contact stress.

By mastering the neutral wrist position for your keyboard setup, you move the workload from the small, fragile muscles of the hand to the larger, more robust muscles of the arms and shoulders. According to OSHA guidelines on keyboard components and hazards, failing to maintain this alignment is a primary risk factor for microtraumas—those tiny injuries that eventually lead to chronic pain.
Key Spacing and Tactile Geometry
Not all keyboards are built the same, and the physical dimensions of the keys themselves play a role in your keyboard ergonomics position. Ergonomic standards generally recommend a horizontal spacing of 18–19 mm (0.71–0.75 inches) between the centers of keys. Vertically, the sweet spot is 18–21 mm.
Why does this matter? If keys are too cramped, your fingers have to “crowd” together, leading to ulnar deviation. If they are too far apart, you’re constantly overreaching. Furthermore, the “key action”—how much force it takes to press a key—is vital. A keyboard that is too stiff requires excessive “actuation force,” while one that is too sensitive can lead to accidental keystrokes and tension as you try to “hover” your fingers. As noted in the CCOHS guide on keyboard selection, the goal is a “light touch” that minimizes the impact on your finger joints.
Understanding Keyboard Ergonomics Position in 3D
Ergonomics isn’t a flat, 2D map; it’s a 3D puzzle. We have to look at three specific types of strain:
- Vertical Bend: This is the up-and-down movement of the wrist.
- Rotational Strain (Pronation): This happens when you palm-down flat on a desk. Most humans naturally have a slightly rotated forearm. Forcing them flat causes “pronation pressure.”
- Horizontal Deviation: Angling the hands inward or outward.
True comfort comes from geometry, not just branding. A keyboard labeled “ergonomic” won’t help if it’s placed at the wrong height. We focus on an ergonomic keyboard and mouse setup for enhanced comfort by addressing all three dimensions simultaneously.
Setting the Foundation: Height, Distance, and Tilt
The foundation of a good setup starts with where the keyboard sits in relation to your body.
The 2-6 Inch Rule: Your keyboard should be placed approximately 2 to 6 inches (5 to 15 cm) from the front edge of the desk. This provides enough room to support your forearms on the desk surface if needed, without forcing you to lean forward and lose your back support.
Elbow Height is Key: The surface of your keyboard should be at or slightly below your seated elbow height. If you have to reach “up” to type, you are inviting shoulder fatigue. If your desk is too high and cannot be adjusted, you may need to raise your chair and use a footrest to keep your feet supported.

The Case for Negative Tilt
Most standard keyboards come with “feet” at the back that tilt the keyboard upward. Stop using them. This creates a “positive tilt,” which is an ergonomic nightmare. It forces your wrists into extension (bending upward), which increases pressure inside the carpal tunnel.
Instead, research from Cornell University champions the negative tilt. This is where the back of the keyboard is lower than the front (the edge closest to you). A negative slope of up to -15 degrees allows your wrists to stay in a perfectly straight, neutral line while your arms follow the natural downward slope of your thighs. This is often achieved through keyboard trays: finding the perfect height for your setup, which allow for articulating adjustments that a flat desktop cannot provide.
Optimizing Keyboard Ergonomics Position for Standing Desks
Standing desks are fantastic for movement, but they introduce new challenges for your keyboard ergonomics position. When standing, it is even easier to “lean” on the keyboard or let your wrists sag.
- Forearm Support: Ensure your keyboard height allows your forearms to stay parallel to the floor.
- Monitor Alignment: Your monitor must be at eye level so you don’t hunch over the keyboard.
- Core Engagement: Shift your weight frequently.
- Peripherals: Use an external keyboard if you are using a laptop on a standing converter.
Check out our guide on how to set up your workstation ergonomically for peak comfort for a deeper dive into the standing transition.
Advanced Configurations: Trays, Split Designs, and Left-Handed Needs
If a standard rectangular keyboard isn’t cutting it, it’s time to look at alternative geometries.
Split Keyboards: These are divided into two halves. This allows you to position the keys at shoulder-width, preventing your shoulders from rounding inward. Some split designs also offer “tenting”—raising the middle of the keyboard—to reduce pronation pressure on the forearms. This is a game-changer for preventing conditions like epicondylitis (tennis elbow).
Contoured and Arc Designs: These keyboards mimic the natural “arch” of the human hand. They often feature a “v-shape” that helps keep the wrists straight. You can find several of these in our review of wireless and painless: the best ergonomic keyboards for Mac and PC.

Keyboard Trays and Work Surface Adjustments
A high-quality keyboard tray is often the missing link in a perfect keyboard ergonomics position. A good tray should:
- Be height adjustable.
- Offer negative tilt (0 to -15 degrees).
- Provide enough space for both the keyboard and the mouse.
- Allow for “swivel” to clear the desk when not in use.
If you are struggling with a desk that is too thick or has a central pencil drawer that hits your knees, removing that drawer is often the first step to getting your keyboard low enough. For more on this, see ergonomic keyboard and mouse setups for maximum comfort.
Solutions for Left-Handed and Alternating Users
Standard keyboards are biased. The 10-key numeric pad is almost always on the right, which forces right-handed users to reach much further for their mouse. This creates asymmetrical strain on the right shoulder.
The Solution: Consider a “tenkeyless” keyboard (one without the number pad) or a keyboard with a detached, programmable keypad. This allows you to place the keypad on the left or move it out of the way when not in use, bringing the mouse closer to your body’s midline. This is a core part of a balanced ergonomic keyboard and mouse setup.
Integrating Your Workstation: Monitors, Mice, and Movement
Your keyboard doesn’t exist in a vacuum. Its position is dictated by your monitor and mouse.
The Midline Rule: The center of your keyboard’s letter section (usually the ‘G’ and ‘H’ keys) should be aligned with the center of your monitor and the center of your body. If you use two monitors, the primary monitor should be centered, or the seam between the two should be centered if you use them equally. Studies show that a proper dual-monitor setup can increase productivity by 30%, but only if you aren’t twisting your neck to see them.
Mouse Proximity: The mouse should be on the same level as the keyboard and as close to it as possible. Reaching out to the side for the mouse is a common cause of keyboard wrist injury: when your hands go on strike.
Accessories to Enhance Your Keyboard Ergonomics Position
While the keyboard’s position is the most important factor, accessories can provide the “finishing touches” for comfort.
| Accessory | Best For | Pro Tip |
|---|---|---|
| Gel Wrist Rest | Soft, cooling support | Use only between typing sessions, not while active. |
| Foam Wrist Rest | Firm, contoured support | Supports the heel of the palm, not the wrist joint. |
| Adjustable Feet | Changing tilt | Use them to create a flat or negative tilt, never positive. |
| Laptop Stand | Screen height | Always pair with an external keyboard and mouse. |
For a full breakdown of materials and types, visit our guide on ergonomic wrist rests for typing.
The 20-20-20 Rule and Movement Breaks
Even the most perfect keyboard ergonomics position will become painful if you hold it for eight hours straight. Static posture is the enemy of circulation.
We recommend the 20-20-20 Rule: Every 20 minutes, look at something 20 feet away for 20 seconds. While you’re at it, perform a “micro-stretch.” Rotate your wrists, squeeze your shoulder blades together, and take a sip of water. These small breaks prevent waste products from building up in your muscle tissue. Learn more about how employees can stop repetitive strain injuries before they start through consistent movement.
Common Mistakes and Injury Prevention
Are you a “T-Rex” typer? This happens when your keyboard is too high and too close to your chest, forcing your arms to tuck in tightly and your wrists to cock upward. It looks funny, but the resulting nerve compression is no joke.
Other common mistakes include:
- The Slouch: Leaning forward to see the keys, which rounds the spine and strains the neck.
- The Reach: Placing the keyboard too far away, causing “winged” shoulder blades.
- Cluttered Workspace: Not having enough room to move your mouse freely, leading to cramped, jerky movements.
- Heavy Handedness: Typing with more force than necessary (banging on the keys).
These habits contribute to Carpal Tunnel Syndrome, Tendonitis, and general Repetitive Strain Injury (RSI). By correcting your keyboard ergonomics position, you aren’t just getting comfortable—you’re protecting your career longevity.
Frequently Asked Questions about Keyboard Ergonomics Position
Should I use the little feet on the back of my keyboard?
In almost all cases, no. Those feet were originally designed to help people see the keys better, but they force your wrists into a “cocked back” position (extension). This is one of the fastest ways to develop wrist pain. Keep your keyboard flat or, better yet, tilted slightly away from you.
Is it better to type with my wrists resting or floating?
Your wrists should “float” like a pianist’s while you are actively typing. This allows you to use the larger muscles of your arms to move your hands across the keys, rather than twisting your wrists side-to-side (ulnar deviation). Use a wrist rest only to support the heel of your palm during moments of rest.
How do I fix my keyboard position if my desk is too high?
If you can’t lower the desk, you must raise the “user.” Raise your chair until your elbows are at the correct height relative to the desk. Since this will likely leave your feet dangling, you must use a footrest to prevent pressure on your thighs and maintain lower back health.
Conclusion
Finding your “Neutral Zone” isn’t about buying the most expensive gear; it’s about understanding the science of how your body interacts with your tools. At Dims Finance, we believe that science-based ergonomics is the foundation of long-term wellness and productivity.
A proper keyboard ergonomics position reduces the “compensation” your body has to perform every time you hit a key. Over thousands of keystrokes a day, that reduction in effort adds up to a significant decrease in injury risk and a massive boost in well-being.
Take ten minutes today to audit your workstation. Check your elbow angle, flatten your keyboard, and move your mouse closer. Your future self—the one without the wrist splints—will thank you.
Ready to upgrade your setup? Explore our full range of ergonomic desk accessories to find the tools that support your journey to a pain-free workday.