Why Every Heavy Typist Needs a Split Keyboard Adjustment Guide
A split keyboard adjustment guide gives you the fastest path from wrist pain and hunched shoulders to a comfortable, sustainable setup — without guessing your way through weeks of frustration.
Here’s how to adjust a split keyboard for comfort, fast:
- Position the halves at shoulder width — each half in front of its corresponding shoulder
- Tent the halves at roughly 30 degrees — tilting them inward reduces forearm pronation
- Angle each half outward so your wrists stay straight and align with your forearms
- Start with a 56-key layout to keep familiar key positions and shorten the learning curve
- Practice 10 minutes daily — most users return to their previous typing speed within 2–6 weeks
- Customize your keymap using QMK or VIA firmware to preserve muscle memory
If you type for hours every day, your standard keyboard is likely working against you. The traditional keyboard design dates back over 150 years — it was built to stop typewriter jams, not to protect your tendons.
The result? Most heavy typists end up with their wrists bent outward (called ulnar deviation), their forearms rotated flat (pronation), and their shoulders pulled inward — all day, every day.
Split keyboards fix this by letting each hand rest in a natural position, the way your arms hang at your sides or reach out for a handshake. But switching to one isn’t just plug-and-play. The physical split, the new key layout, and the firmware customization all take some getting used to.
This guide walks you through every stage of that adjustment — from your first day to the point where going back to a regular keyboard feels like the strange choice.
Understanding the Split Keyboard Adjustment Guide for Beginners
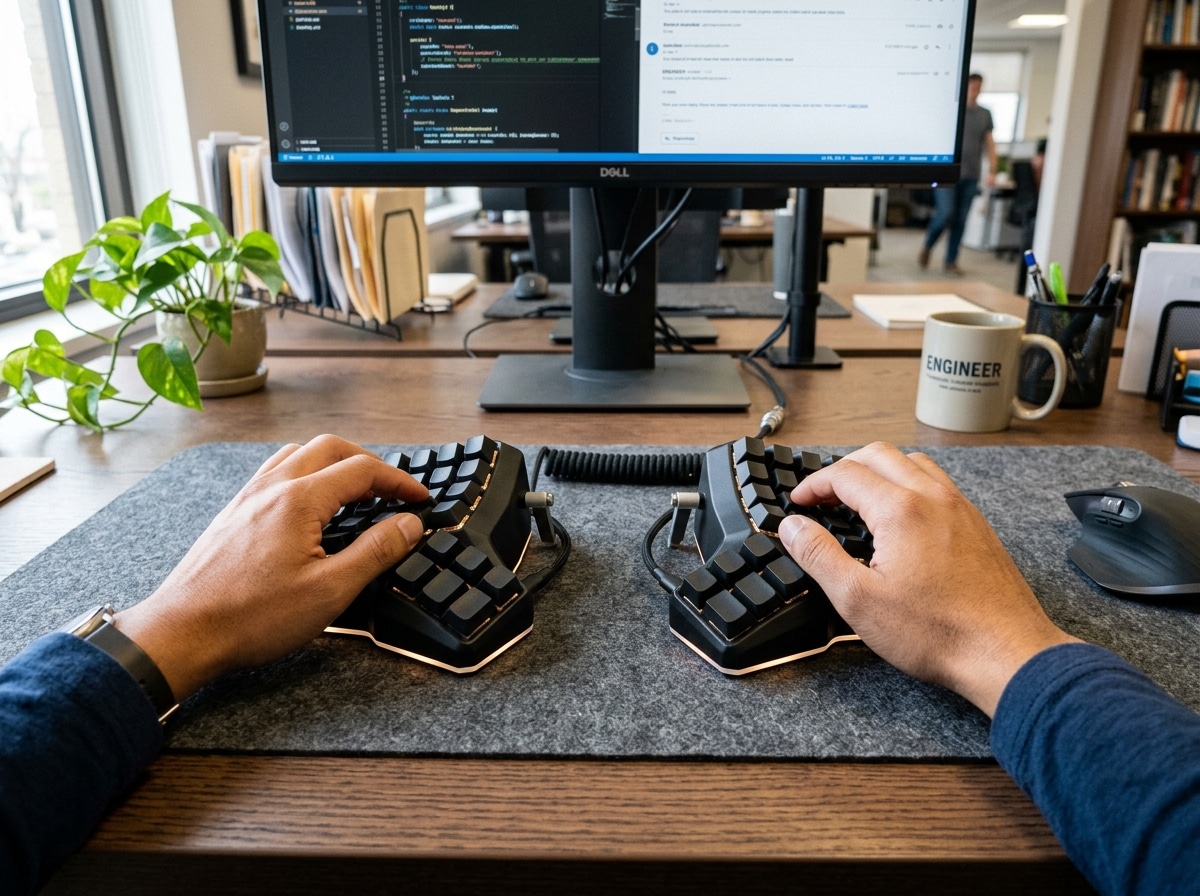
When we first look at a split keyboard, the “gap” in the middle is the most obvious change, but the real magic happens in the geometry of the keys. Most high-end ergonomic splits move away from the traditional “staggered” rows we’ve used since the 1800s. Instead, they use a columnar layout.
In a columnar setup, the keys are aligned in straight vertical columns that match the different lengths of your fingers. Your middle finger doesn’t have to tuck under your index finger to hit a key; it just moves straight up and down. This significantly reduces lateral strain. Some models take this further with concave keywells, where the keyboard surface is scooped out like a bowl. This ensures every key is roughly the same distance from your fingertip, minimizing finger travel and fatigue.
To keep your transition smooth, we recommend starting with a 56-key layout. This “Goldilocks” size is large enough to keep your number row and familiar symbols in their ANSI-standard spots, which preserves much of your existing muscle memory. If you go too small too fast (like a 36-key board), you’ll spend more time fighting layers than typing. Achieving a mastering the neutral wrist position for your keyboard setup is much easier when the hardware matches the natural arc of your hands.
How Long Does a Split Keyboard Adjustment Guide Take to Master?
The question everyone asks is: “When will I be fast again?” Based on user data, most people return to their previous typing speed within two to six weeks.
The first week is often the “Valley of Despair,” where your brain is fighting decades of staggered-row habits. However, by the end of week two, most typists hit their baseline recovery. By the end of a month, many users actually exceed their previous speeds because the columnar layout is fundamentally more efficient.
Deliberate practice is the secret sauce. Spending just 10 minutes a day on a typing trainer like Keybr or Monkeytype helps lock in the new muscle memory without the pressure of a looming work deadline.

Choosing Between Flat, Sculpted, and Integrated Models
Not all splits are created equal. You generally have three paths:
- Flat Split Models: These look like a standard keyboard cut in half. They are great for portability and have the shallowest learning curve.
- Sculpted/Concave Models: These feature the “bowls” mentioned earlier. They offer the maximum ergonomic benefit but are bulkier and harder to travel with.
- Integrated Pointing Devices: Some splits include a trackball or trackpad built right into the thumb cluster.
| Feature | Trackball Integrated | Trackpad Integrated | Traditional Mouse |
|---|---|---|---|
| Hand Movement | Zero (Thumb only) | Zero (Finger swipe) | High (Arm reach) |
| Precision | High (Great for CAD/Coding) | Medium (Gestures/Browsing) | High |
| Ergonomic Score | Excellent | Very Good | Fair |
When it comes to hardware, you also need to choose between MX switches (standard height, huge variety) and Choc switches (low profile, great for laptop-style feels). If you want to type immediately, buy prebuilt. If you enjoy a 20-hour project and own a soldering iron, DIY kits offer deep customization.
Optimal Positioning: Shoulder Width and Tenting
The primary goal of a split keyboard is to open your chest. Standard keyboards force your shoulders to rotate inward, which leads to that “hunchback” posture. By placing the halves at shoulder width, you allow your pectoral muscles to relax and your shoulder blades to sit flat against your back.
Then comes tenting. Tenting refers to raising the inner edge of each keyboard half. When your hands rest flat on a table, your forearm bones (radius and ulna) are crossed. This is called pronation. By tilting the keyboard halves up—ideally at about 30 degrees—your hands move toward a “handshake” position. This reduces pressure on the carpal tunnel and allows for a more ergonomic keyboard and mouse setup for enhanced comfort.
Step-by-Step Split Keyboard Adjustment Guide for Posture
Proper setup is a progressive journey. Don’t feel like you have to go to maximum width on day one.
- Phase 1: The Angled Split. Keep the halves close together but tilt them so they align with the natural angle of your forearms.
- Phase 2: The Shoulder Split. Move the halves out until they are directly in front of your shoulders. This is the “sweet spot” for back straightening.
- Phase 3: Central Placement. Once your hands are wide, you have a new continent of desk space in the middle. This is the perfect spot for a wrist management finding the best rsi mouse for pain free scrolling or even a notepad.
Listen to your body’s feedback. If you feel a “pull” in your outer wrists, you might be splitting too wide. If your neck feels tight, check your monitor height in relation to your new hand position.
Mastering Keymaps and Firmware Customization
The hardware is only half the story. Most split keyboards run on QMK (Quantum Mechanical Keyboard) firmware. This allows you to tell any key to do anything. If you aren’t a programmer, don’t worry—tools like VIA or ZMK Studio provide a simple drag-and-drop interface to change your layout.
The biggest game-changer is the Thumb Cluster. On a normal keyboard, your strongest fingers—the thumbs—only hit one giant spacebar. On a split, your thumbs handle Space, Backspace, Enter, Delete, and Layer toggles. This moves the heavy lifting away from your weak pinky fingers, preventing keyboard wrist injury when your hands go on strike.
Advanced Strategies: Home-Row Mods and Tap/Hold
Once you’re comfortable, you can explore “Home-Row Mods.” This is a strategy where holding down a home-row key (like ‘A’ or ‘S’) acts as a modifier (like Shift or Ctrl), but tapping it still types the letter.
- Avoid “Spider Combos”: These are awkward shortcuts that require your hand to contort (like hitting Ctrl+Shift+T with one hand). By moving modifiers to your thumbs or home row, these combos become effortless.
- Mid-Shift: Some users prefer placing the Shift key in the middle of the board or on a thumb key to avoid the “pinky stretch.”
- Navigation Layers: Imagine holding a thumb key and having your right-hand home keys turn into arrow keys. You never have to move your hand to the “arrow cluster” again.
Using ergonomic wrist rests for typing can help stabilize your hands while you experiment with these new layered commands.
Common Pitfalls and How to Avoid Them
Even with a split keyboard adjustment guide, there are traps to watch out for:
- The Pinky Trap: Many beginners try to keep all their old habits, like reaching far for the ‘P’ or ‘Q’ keys. On a split, if a key feels like a stretch, move it to a thumb layer.
- The “All-at-Once” Error: Switching to a split keyboard, a new layout (like Colemak), and a new mouse at the same time is a recipe for burnout. Change one thing at a time.
- Bent Pins: If you’re using a hotswap board and a key isn’t working, it’s usually a bent switch pin. Pull it out, straighten it with tweezers, and try again.
- Cable Care: Always use the provided TRRS cable to connect halves. Never “hot-plug” the halves (unplugging the cable while the USB is still in), as this can short out the controller on some models.
Frequently Asked Questions about Split Keyboards
Do I need a separate mouse with an integrated pointing device?
Not necessarily! If you choose a model with an integrated trackball, you can perform 90% of your daily tasks without ever moving your hand from the keyboard. This is a massive win for shoulder health, as it eliminates the “reach” for the mouse that causes rotator cuff strain. However, for high-speed gaming or intensive graphic design, some users still keep a traditional mouse on the side for specialized tasks.
Are split keyboards suitable for programming and travel?
They are a programmer’s best friend. Being able to map brackets, braces, and navigation arrows to the home row via layers makes coding significantly faster. For travel, look for “flat” low-profile models. They fit easily into a laptop sleeve and provide full ergonomic support in coffee shops or on planes.
How do I handle the transition without losing productivity?
The “Fixed-and-Float” philosophy is helpful here. Keep your old keyboard nearby for “emergency” high-speed work during the first week. Use the split keyboard for 30 minutes in the morning, then an hour, then half the day. Using OffsetKey-70 MX Split Ergonomic Keyboard User Guide | PandaKB or similar resources for your specific model can help you troubleshoot connection issues quickly so you don’t lose time.
Conclusion
At Dims Finance, we believe that your workspace should adapt to your body, not the other way around. Investing in a split keyboard is a commitment to your long-term health and workplace wellness. By following this split keyboard adjustment guide, you aren’t just buying a new gadget; you’re adopting a science-based approach to reducing RSIs and boosting your daily well-being.
The “gap” between the two halves of your keyboard might look strange at first, but it’s exactly where your comfort lives. Once you experience the relief of a neutral wrist and an open chest, you’ll wonder how you ever typed without it. For more tips on optimizing your desk, check out our guide on ergonomic keyboard and mouse setup.