Mastering Neutral Wrist Position and Hand Alignment
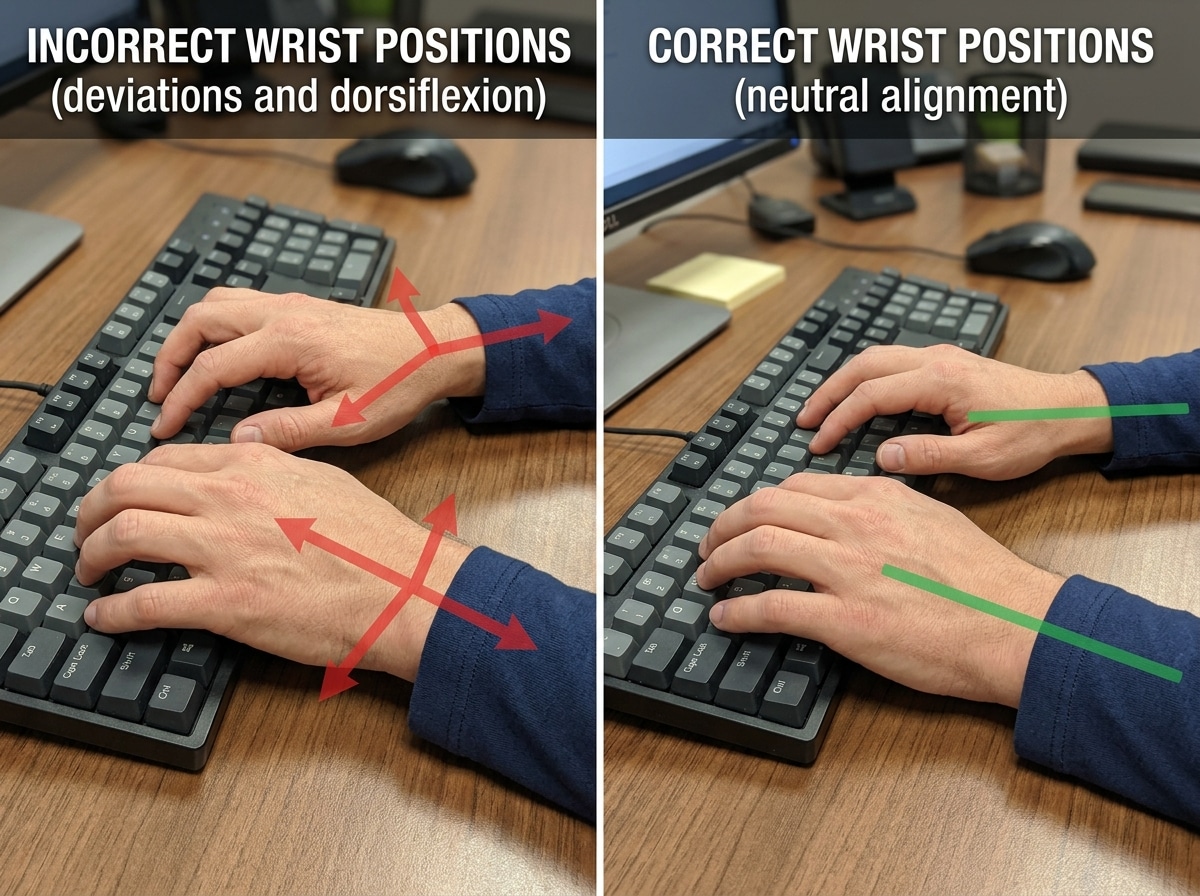
The cornerstone of all RSI prevention keyboard techniques is maintaining a neutral wrist position. Think of your wrist as a bridge; if the bridge is buckled or twisted, traffic (blood flow and nerve signals) can’t get through efficiently. When you type with bent wrists, you compress the carpal tunnel, leading to inflammation and pain.

To protect yourself, you must avoid three common “deviations”:
- Ulnar Deviation: This happens when you angle your hands outward toward your pinky fingers. It is the most common mistake made on standard, straight keyboards.
- Radial Deviation: This is the opposite—angling your hands inward toward the thumbs.
- Dorsiflexion (Extension): This occurs when you “cock” your wrists upward. This is often caused by using the little “kickstand” feet at the back of a keyboard, which is a major ergonomic no-no.
We also need to talk about contact stress. Many of us have a habit of resting our wrists on the edge of the desk or a hard wrist rest while we type. This creates pressure on the tendons and nerves. Instead, we recommend “floating” your hands. Your hands should move freely above the keys, powered by your arms and shoulders, rather than being anchored in one spot. For more on this, check out our guide on mastering the neutral wrist position for your keyboard setup.
If you feel like your hands are “going on strike” with sharp pains or numbness, it’s a sign that these deviations are taking a toll. You can read more about what happens when keyboard wrist injuries take hold.
Proper Arm and Shoulder Posture
Your wrists don’t exist in a vacuum; they are attached to your arms, which are attached to your shoulders. If your shoulders are hunched up to your ears, your wrists will suffer.
- The 90-Degree Rule: Your elbows should be bent at an angle between 90 and 110 degrees.
- Parallel Forearms: Your forearms should be roughly parallel to the floor.
- Relaxed Shoulders: Drop your shoulders. If you find yourself “tensing” or “hovering” your shoulders, your chair or desk height is likely wrong.
- Avoid Elbow Leaning: Leaning on your elbows for years can lead to ulnar nerve entrapment (the “funny bone” nerve). This tension eventually “catches up with you” in the form of shoulder and neck strain.
Achieving this setup often requires adjusting your chair height so your feet are flat on the floor while your arms remain at the correct level. For a deep dive into the full setup, see our article on how to set up your workstation ergonomically for peak comfort.
Advanced RSI Prevention Keyboard Techniques for Daily Use
Once your posture is set, we need to look at how you actually hit the keys. Many RSI sufferers “peck” at the keys with high force or contort their fingers into “claws” to reach distant shortcuts.
One of the most powerful RSI prevention keyboard techniques is using two-handed key combinations. When you need to press “Ctrl + C” or “Shift + A,” do not stretch one hand to reach both keys. This creates extreme tension in the hand. Instead, use the modifier key (Ctrl/Shift/Alt) with one hand and the letter key with the other. This keeps both hands in a relaxed, neutral shape.
Other techniques include:
- Minimal Activation Force: Don’t “bottom out” your keys. Use the lightest touch necessary to register the character. If your keyboard requires a heavy “thump,” it might be time for an upgrade.
- Whole Arm Movement: Instead of twisting your wrist to reach the “Backspace” or “Enter” key, move your entire arm. This distributes the work to larger muscle groups.
- Palm Rests vs. Wrist Rests: Use a rest only to support the palm or heel of the hand during brief pauses. Never place pressure directly on the wrist joint itself while typing. Learn more about the nuances of ergonomic wrist rests for typing.
For those already feeling the burn, we highly recommend reading Preventing and healing repetitive strain injury (RSI) and carpal tunnel syndrome for a perspective on how these techniques can actually reverse existing damage.
Optimizing Layouts with RSI Prevention Keyboard Techniques
Did you know the standard QWERTY layout was actually designed to slow you down? In the era of mechanical typewriters, fast typing caused the metal arms to jam. To prevent this, the most common letter pairs were moved far apart.
For modern users, this means our fingers travel miles every day across the “keyboard desert.” To combat this, consider alternative layouts:
- Dvorak: This layout places the most frequently used letters on the “home row” (where your fingers naturally rest). Studies show Dvorak can reduce finger travel distance by over 50%.
- Colemak: A middle ground that keeps many QWERTY shortcuts (like ZXCV) but moves common keys to the home row for better ergonomics.
- Remapping Caps Lock: The “Caps Lock” key is prime real estate that most people rarely use. Many experts remap it to “Control” or “Backspace” to reduce the strain on the left pinky finger.
Switching layouts takes time (usually a few weeks of feeling like a “stroke patient” as your brain rewires), but the long-term health benefits are immense. We discuss these transitions in our guide on how employees can stop repetitive strain injuries before they start.
Software and Shortcuts as RSI Prevention Keyboard Techniques
The best way to prevent RSI from typing is, ironically, to type less. We can use technology to reduce the physical load on our hands:
- Voice Dictation: Modern OS tools (and software like Dragon) are incredibly accurate. Dictating emails can give your hands a much-needed 15-minute break every hour.
- Autocorrect and Text Expansion: Use tools that turn “omw” into “on my way.” This saves thousands of keystrokes over a month.
- Keyboard Shortcuts: While we want to avoid contorted shortcuts, using well-planned shortcuts can reduce your reliance on the mouse.
- Reduce Mouse Clicks: High-sensitivity mouse settings and “click-lock” features can prevent the “claw” tension often found in the mouse hand. You can find more tips in our article on finding the best RSI mouse for pain-free scrolling.
Ergonomic Hardware and Workstation Adjustments
If you are using a standard $10 keyboard that came with your PC, you are likely fighting an uphill battle. Standard keyboards force your hands into ulnar deviation and your forearms into pronation (palms flat), which is not a natural position for the human body.

Investing in ergonomic hardware is one of the most effective RSI prevention keyboard techniques. Here is a comparison of what to look for:
| Keyboard Type | Best For… | Key Benefit |
|---|---|---|
| Standard | Short-term use | Low cost, familiar layout. |
| Split Keyboard | Shoulder & Wrist Pain | Allows hands to stay shoulder-width apart, preventing ulnar deviation. |
| Tented Keyboard | Forearm Strain | Tilts the keyboard like a “tent” so hands stay in a more natural “handshake” position. |
| Mechanical | Finger Fatigue | Offers various “switch” types that require very little force to activate. |
A split keyboard is particularly effective because it allows you to place the mouse directly between the two halves or keep your shoulders open and relaxed. If you’re a Mac or PC user looking for specific models, see our list of the best ergonomic keyboards for Mac and PC.
For more general advice on picking the right gear, our ergonomic keyboard and mouse setup guide is a great place to start.
Keyboard Placement and Desk Height
Even the best keyboard won’t help if it’s sitting on a desk that is too high. Most standard desks are actually 2-3 inches too tall for the average person to type ergonomically.
- Negative Tilt: Ideally, the keyboard should tilt away from you. This allows your wrists to stay in a perfectly straight line while your fingers reach for the keys.
- Keyboard Trays: An adjustable tray can bring the keyboard down to your lap level, which is often the most comfortable height. Check out our tips on finding the perfect height for keyboard trays.
- Lap Desks: If you work from a couch or a chair without a desk, a lap desk can help maintain a neutral position, provided it doesn’t force your wrists to bend upward.
- Monitor Level: Your screen should be at eye level (or slightly below). If you find yourself leaning forward to see the screen, you will naturally tense your arms and wrists.
For a deeper look at how height impacts comfort, read about ergonomic keyboard and mouse setups for enhanced comfort.
The Importance of Breaks and Physical Maintenance
You could have the most expensive “NASA-approved” ergonomic chair and keyboard, but if you sit still for eight hours straight, you will still develop RSI. Movement is the only “cure” for the repetitive nature of office work.

We advocate for a three-tiered break system:
- Micro-breaks: Every 2-3 minutes, take your hands off the keyboard for 10-30 seconds. Drop them to your sides and shake them out.
- Rest Breaks: Every 20-30 minutes, get up. Walk to get water, look out a window, or do a quick stretch.
- The “Subtract 10” Rule: If you know you start feeling pain after 40 minutes of typing, set your timer for 30 minutes. Never type until the pain starts; by then, the “injury” has already occurred for that session.
Break reminder software like Workrave or AntiRSI can be life-savers. These programs monitor your keystrokes and force you to take breaks, even providing on-screen instructions for stretches. For more on maintaining comfort through habits, see our guide on ergonomic keyboard and mouse setups for maximum comfort.
The Harvard RSI Action group emphasizes that many short breaks are significantly more effective than one long break at the end of the day.
Essential Stretches and Habit Building
Stretching helps “reset” the tissues that have been constricted during typing. Here are three essentials:
- The Prayer Stretch: Place your palms together in front of your chest. Slowly lower your hands toward your waist until you feel a gentle stretch in your wrists. Hold for 15-30 seconds.
- Wrist Twists: Gently rotate your wrists in circles to improve circulation.
- Wall Stretches: Place your palm flat against a wall with your arm straight and gently turn your body away to stretch the chest and forearm muscles.
The Marathon Runner Analogy: Think of your hands like a marathon runner. If a runner takes two weeks off for a holiday, they don’t jump back in with a 26-mile run on Monday morning. They would get injured immediately. The same applies to typing. After a holiday or a long weekend, ease back into your typing volume gradually.
Finally, don’t underestimate the role of hydration and diet. Dehydrated muscles and tendons are more prone to “sticking” and inflammation. Drink plenty of water and maintain a diet rich in anti-inflammatory foods to help your body repair the daily wear and tear of office life.
Frequently Asked Questions about RSI Prevention
When should I seek professional medical advice for typing pain?
You should see a doctor if you experience persistent pain, numbness, or tingling that does not go away after a night of rest. If you wake up with “numb” hands or find yourself dropping objects due to weakness, seek professional advice immediately. Early intervention is the difference between a two-week recovery and a two-year struggle.
Are wrist rests recommended while actively typing?
No. You should never rest your wrists on anything while actively moving your fingers. This creates “contact stress” on the carpal tunnel. Use wrist rests only to support your palms during the “rest” between typing bursts.
How long does it take to transition to a Dvorak layout?
It varies, but most people can get back to a functional speed (around 20-30 words per minute) within a week of dedicated practice (1 hour per day). To reach your original QWERTY speed, it usually takes 1 to 2 months. Many users find that napping after a practice session helps the new motor skills “stick” faster!
Conclusion
At Dims Finance, we believe that your career shouldn’t come at the cost of your physical health. By implementing these RSI prevention keyboard techniques—from mastering the neutral wrist position to investing in split keyboards and taking disciplined breaks—you can significantly reduce your risk of chronic injury.
Ergonomics is not a “one and done” setup; it is a lifestyle of constant adjustment and body awareness. Start small: flatten your keyboard today, set a break timer for tomorrow, and listen to what your hands are telling you.
If you are looking to upgrade your workstation with science-backed gear, see our full range of ergonomic desk accessories to find the tools that fit your body best. Stay comfortable, stay productive, and most importantly, stay pain-free.